
Framing Inspection Guide
Your inspector needs to see the framing, how the structural components are connected, and any penetrations or concealed areas that need to be sealed or blocked before the walls are covered.
Show Us How It All Connects.
Start with wide views, then get closer to the structural connections. We need enough detail for your inspector to compare the framing with the approved plans.
Show enough of the surrounding framing so we can tell what each connection is connecting. For repeated connections, show several locations so the inspector can see the installation pattern.
Where required, penetrations should be sealed with an approved fire-rated caulk, fire-rated foam or other approved firestopping system. Larger or irregular concealed openings may require approved fireblocking instead. Keep these areas visible so the inspector can see them before insulation or drywall covers the work.
Have This Ready Before You Submit
Most framing problems are easy to fix before the inspection and expensive to fix after the walls are covered. Have these on hand.
Plans, truss drawings and layouts, connector and hold-down schedules, bracing and shear-wall details. Your inspector compares what is built to these.
All walls, headers, beams, roof framing, bracing and blocking in place, with nothing covering the work we need to see.
Plumbing, electrical and mechanical rough-in that passes through the framing should be installed so penetrations can be reviewed. Check your inspection sequence with your inspector.
A tape measure, a bright light, a ladder to reach top plates and truss connections, and a charged phone.
Truss tags, lumber grade stamps and connector markings visible and facing the camera.
What to Show Your Inspector
Up to eight things, in the order that makes them easiest to follow.
Show only what applies to your project. For example, if your job has no beams and posts, or no roof framing or foundation connections in the area being inspected, skip those cards. Your approved plans decide what is required. Cards that often do not apply are marked If applicable.
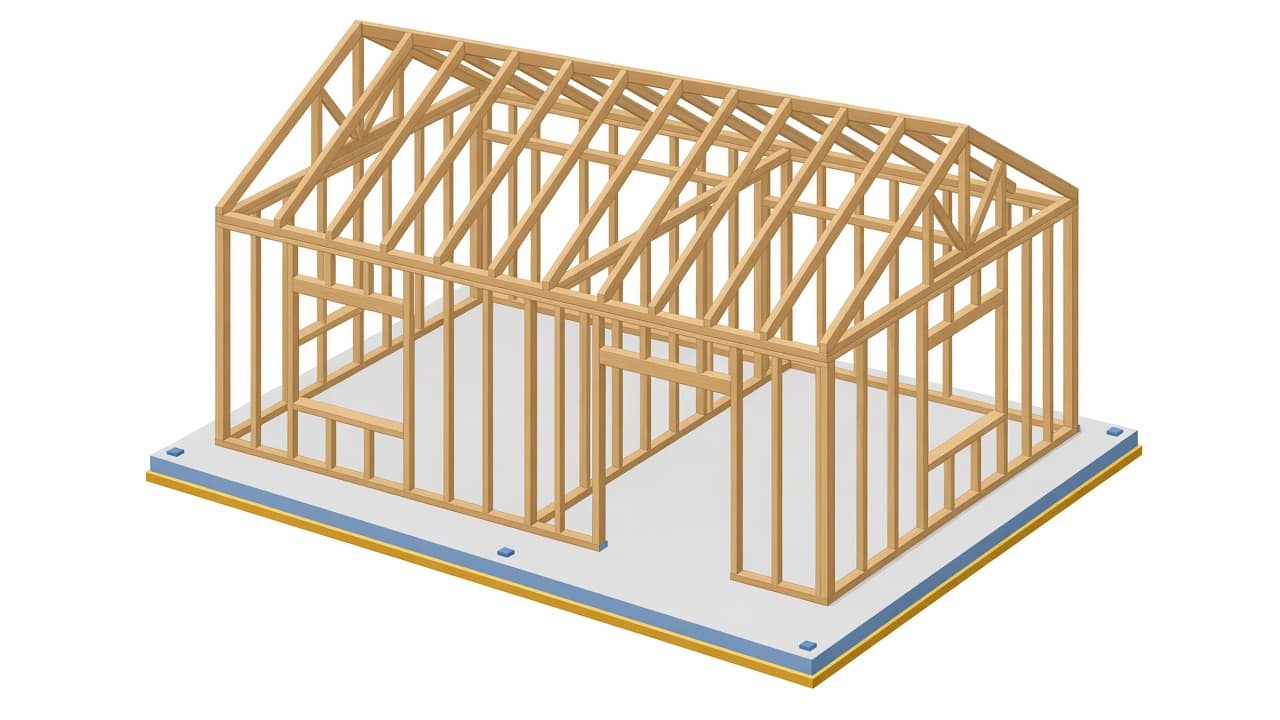
Show us the whole structure.
Start with a slow walkthrough of the entire framed area.
Make sure we can see:
- Exterior and interior walls
- Roof or floor framing
- Beams and posts
- Openings and major structural areas
Not all projects are the same. Adapt the whole-structure view to what your project is. Interior framing, for example, won't show any roof structure, and on many jobs you can't capture everything in one shot. Take it in sections or from different angles. The goal is to show the entire work area so your inspector understands the project and how it all connects.
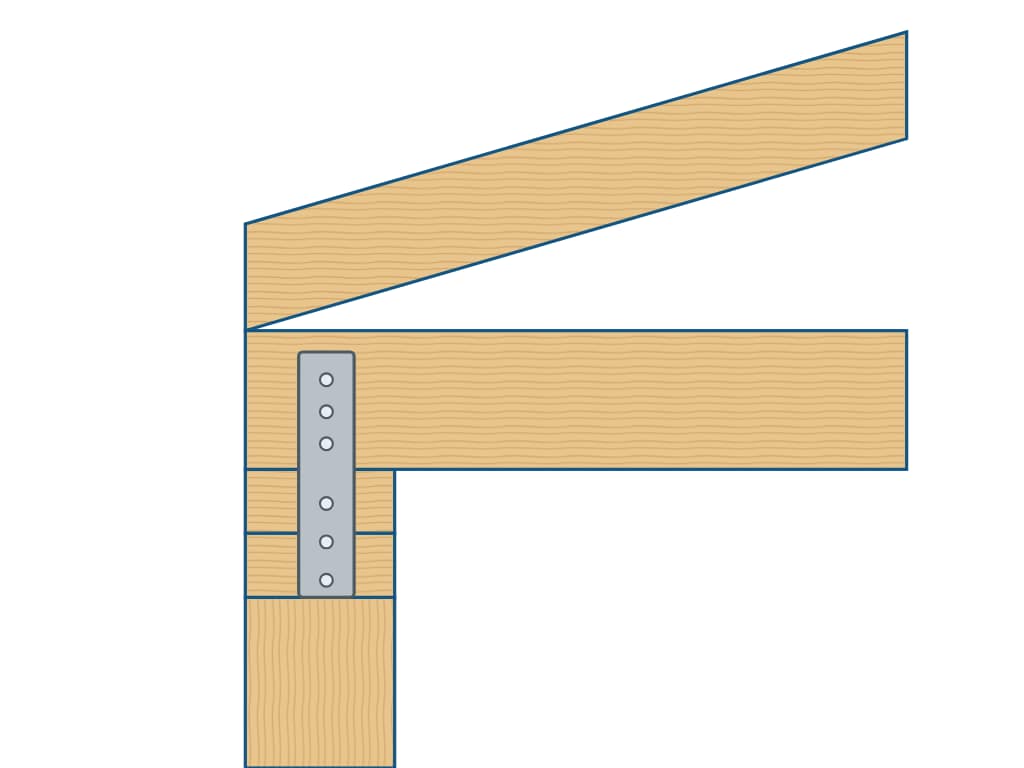
Show us how the roof framing connects.
Show where the trusses or rafters connect to the walls below.
Make sure we can see:
- Truss or rafter connections
- Top plates
- Straps, clips, ties or other connectors
- Enough surrounding framing to identify each connection
Using structural screws instead of connectors? Show clear close-ups of the screws connecting the trusses or rafters to the top plates or wall framing. Then show several locations so the inspector can see the connection pattern throughout the framed area.
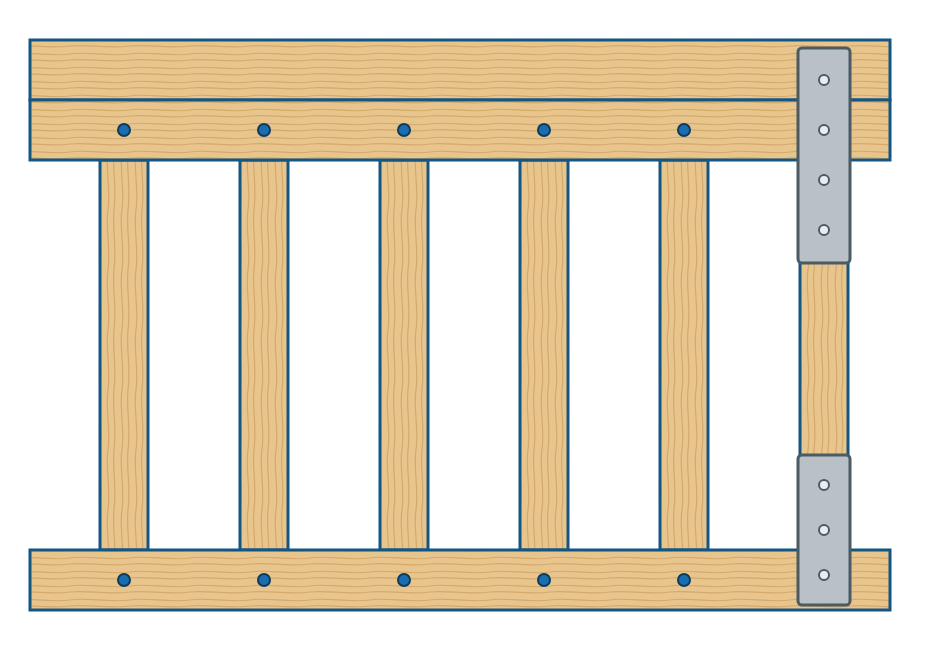
Show us the wall connections.
Follow the framing down from the top plates through the wall.
Make sure we can see:
- Top plates
- Studs
- Bottom plates
- Straps, ties, rods or other connection systems
Using structural screws for the connections? Show clear close-ups where the screws connect the framing members. Include several locations so the inspector can see the connection pattern, not just one screw or one connection.
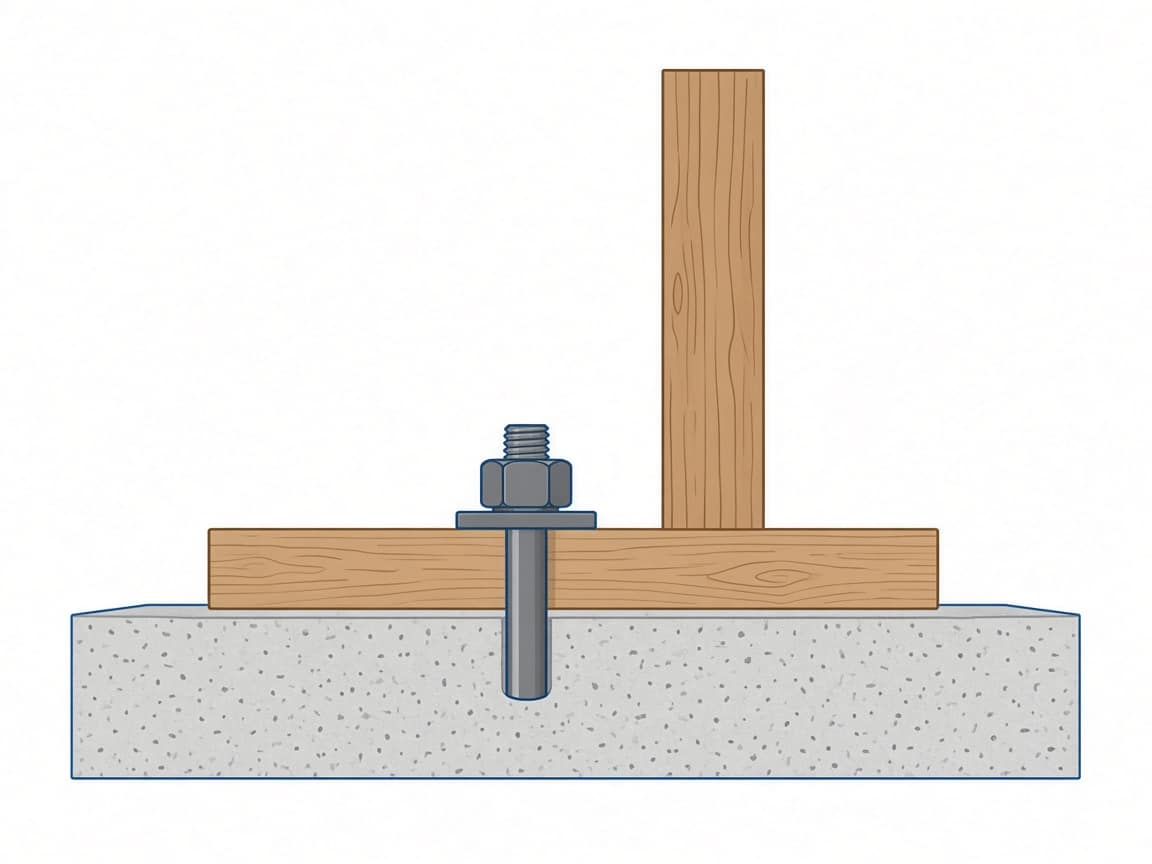
Show us how the framing connects to the foundation.
Show how the walls and structural framing are tied down to the slab or foundation.
Make sure we can see:
- Bottom plate connections
- Anchors and hold-downs
- Rods or continuous tie-down systems, if used
- Where each connection attaches to the foundation
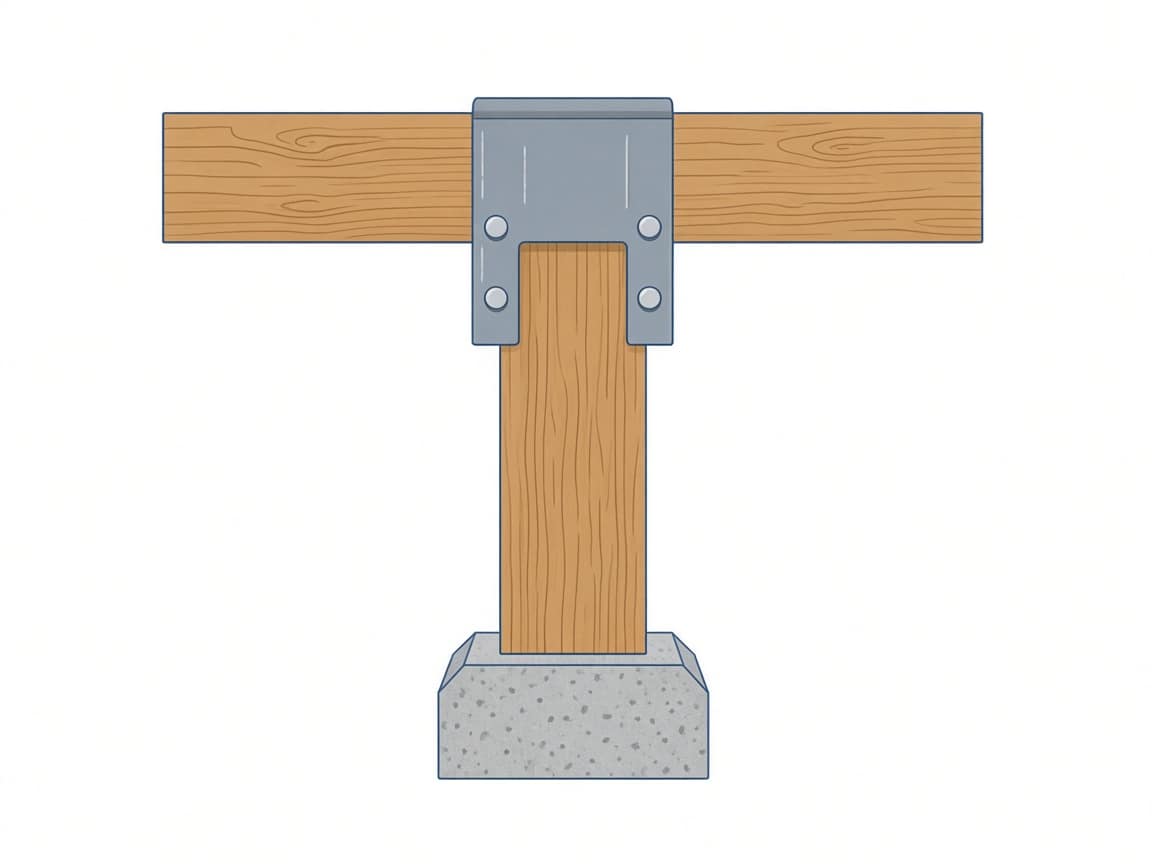
Show us every beam and post.
Show the full beam or post first, then show how it connects to the structure above and below.
Make sure we can see:
- Where beams are supported
- Beam-to-post connections
- Post-to-foundation connections
- Hangers, straps, bolts, screws and other connectors
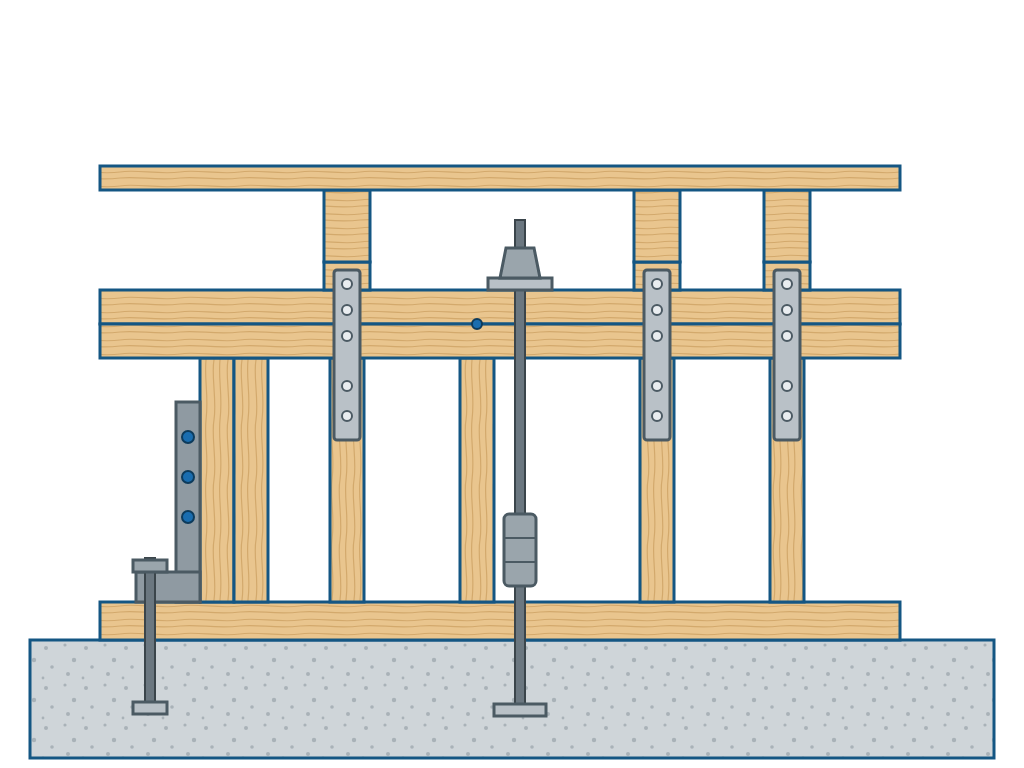
Show us the bracing and special connections.
Show any bracing, hold-downs or special structural connections used on the project.
Make sure we can see:
- Bracing
- Hold-downs
- Straps and ties
- Rods and tie-down systems
- Special connectors
- Any connection that is different from the typical framing
Show us penetrations, firestopping and fireblocking.
Before insulation or drywall covers the framing, show the openings and penetrations that will become concealed.
Make sure we can see:
- Plumbing penetrations
- Electrical wires and conduits passing through framing
- Mechanical penetrations
- Openings through top and bottom plates
- Openings between floors or concealed spaces
- Other holes or gaps that require sealing or blocking
Where required, show the completed firestopping. This may include approved fire-rated caulk, approved fire-rated foam, or another approved system around penetrations. If an opening is too large, irregular or impractical for caulk or foam, show the approved fireblocking method used instead. Show the full area first, then take close-up photos so the inspector can clearly see how the opening or penetration has been sealed or blocked.

Show us anything different or unusual.
If something doesn't look like the rest of the framing, make sure your inspector can see it clearly.
Make sure we can see:
- Changes from the typical framing
- Unusual connections
- Field modifications
- Damaged or altered framing
- Unusual penetrations or concealed openings
- Anything else you think the inspector should see
Common Framing Inspection Failures (and How to Avoid Them)
These are the issues that most often stop a framing inspection from passing, based on Florida Building Code practice. Check each one before you submit.
Connectors don't match the plans
Why it fails. Wrong model, missing connectors, or a substitute installed without approval. Field changes that aren't on the approved plans can also fail.
How to avoid it. Check the connector schedule and truss drawings before you install. If you need to substitute or change something, get approval from the engineer or designer first, and show the approved revision.
Empty nail holes or the wrong fasteners
Why it fails. Connectors are rated with the fasteners the manufacturer specifies. Missing nails, short nails, or drywall or deck screws in place of the specified fasteners can reduce the connection's capacity.
How to avoid it. Fill the holes called for in the connector's installation instructions, using the specified fastener type and size. Take one close-up per connector type, then show several locations.
The load path isn't continuous
Why it fails. A strap, hold-down, anchor or tie-down rod is missing or doesn't line up, so the connection from the roof to the foundation has a gap.
How to avoid it. Trace the load path on your plans from the roof down to the foundation, then walk it top to bottom on video. Show each link: roof connection, wall ties, hold-downs, anchors.
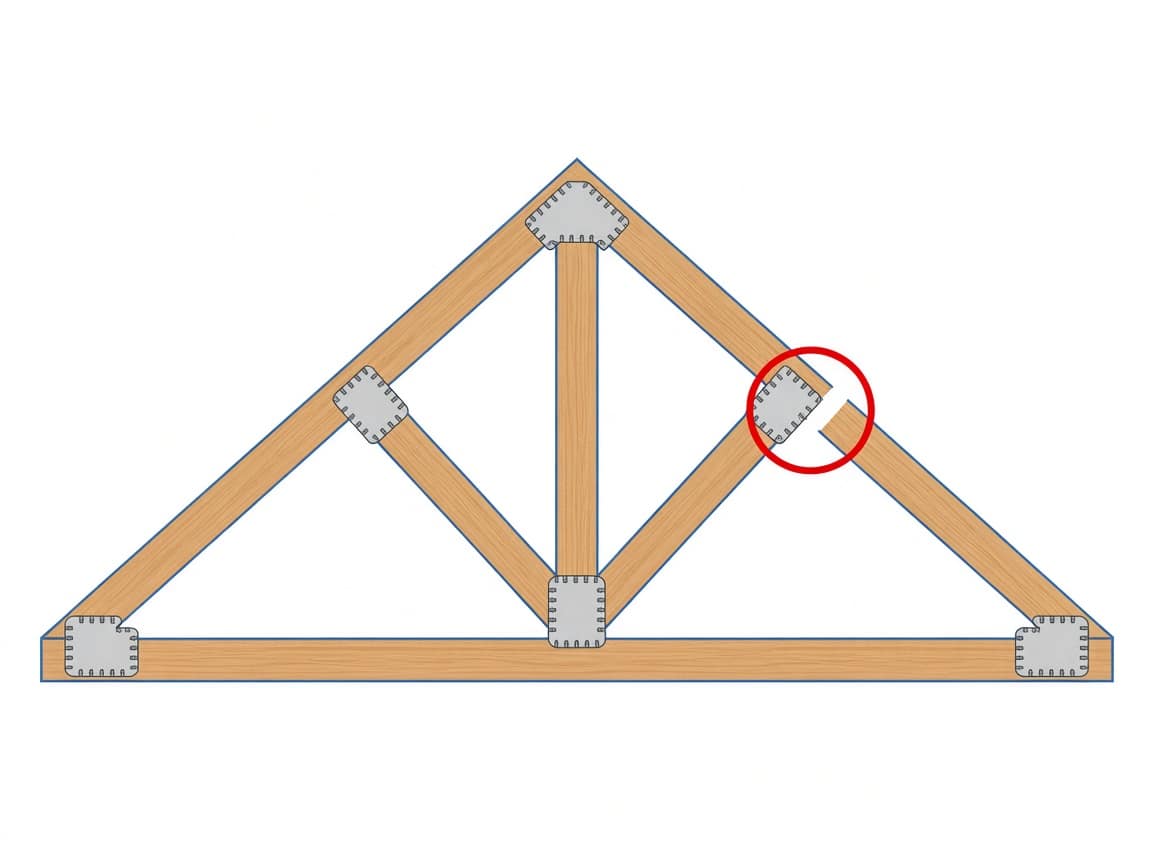
Trusses are altered, damaged or unbraced
Why it fails. Field-cut, notched or drilled trusses, or missing temporary or permanent bracing called for in the truss drawings.
How to avoid it. Don't cut or modify a truss. If something is in the way or damaged, contact the truss manufacturer or engineer for a repair detail before the area is covered. Show the bracing required on the truss drawings.
Studs, plates or joists are over-drilled or over-notched
Why it fails. Large holes and deep notches weaken the member. Plumbers and electricians sometimes cut after the framers finish.
How to avoid it. Plan the routes with the other trades before drilling. Consult your Engineer of Record (EOR) before drilling or notching any framing member, and keep holes and notches within the limits in the code or on your plans, or use an approved reinforcement. Show any hole or notch in a stud, plate or joist with a tape measure.
Outside the High-Velocity Hurricane Zone, FBC-Residential R602.6 and R502.8 and FBC-Building 2308 (conventional light-frame) are marked "Reserved" in Florida's 8th edition. Hole and notch limits then come from your engineered design (ANSI/AWC NDS) and your approved plans.

Nailing doesn't follow the schedule
Why it fails. Wrong nail type or size, wrong spacing, overdriven nails, or missing nails at plates and connections.
How to avoid it. Follow the nailing schedule on your plans, or the code's fastener schedule where the plans refer to it. Use the nail type specified, and set nails flush rather than deep.
Headers, beams and posts don't match the plans
Why it fails. Header or beam size, species or grade differs from the plans, missing jack or king studs, or a beam without proper bearing or a post connection.
How to avoid it. Compare each opening and beam to the header and beam schedule before you call. Keep lumber grade stamps visible, and show beam-to-post and post-to-foundation connections.
Penetrations aren't sealed or blocked
Why it fails. Open gaps around pipes, wires and ducts through plates, or concealed spaces that haven't been blocked before the area is covered.
How to avoid it. Seal penetrations with an approved fire-rated caulk, foam or other approved system, and use approved fireblocking in larger or irregular openings. Show the sealed work before insulation or drywall goes in.
Untreated lumber or the wrong connector finish
Why it fails. Wood in contact with concrete or the ground that isn't pressure-treated or naturally durable, or connectors with a finish that isn't suitable for treated lumber.
How to avoid it. Use pressure-treated bottom plates on slabs and follow the connector manufacturer's finish guidance for treated lumber. Show the plate and its markings.
We can't see it
Why it fails. Only close-ups with no context, blurry or dark video, work already covered, or a connection we can't place in the structure.
How to avoid it. Start wide, then go close. Use light. Show several locations for repeated connections. Keep the work exposed until your inspection is approved.
Code references in this guide
Based on the Florida Building Code, 8th Edition (2023). Section numbers are for orientation. Check them against the code and your approved plans.
- FBC-Building 2318.1.9 Notching ↗ Studs, High-Velocity Hurricane Zone: studs carrying more than 75% of their capacity can't be notched or cut. At 75% or less, a notch up to one-third of the depth is allowed.
- FBC-Building 2318.1.10 Pipes in walls ↗ High-Velocity Hurricane Zone: where pipes require cutting a plate, a metal tie (at least 1 in. by 1/8 in.) goes across the opening on each side of the plate.
- FBC-Building 2319.5 Notching and boring ↗ Joists and rafters, High-Velocity Hurricane Zone: notches no deeper than 1/6 of the depth, none in the middle third of the span, end notches no deeper than 1/4. Holes only in the middle third, no larger than 1/6 of the depth, spaced at least one member depth apart.
- FBC-Residential R802.7 Cutting, drilling and notching ↗ Roof members: notches on cantilevered rafters (remaining depth at least 3 1/2 in., cantilever up to 24 in.) and ceiling joist taper cuts (no more than 1/4 of the depth). Trusses and engineered lumber can't be cut or drilled without the manufacturer's or a design professional's approval.
- FBC-Building Table 2304.10.1 ↗ Fastening schedule
- FBC-Residential R302.11 ↗ Fireblocking
- FBC-Residential R317.1 ↗ Protection of wood members from decay
- FBC-Residential R602.3 ↗ Design and construction of wood-frame exterior walls (points to R301.2.1.1 or ANSI/AWC NDS)
Links open the official Florida Building Code, 8th Edition (2023), on ICC Digital Codes (codes.iccsafe.org). Some references are from the Residential volume and others from the Building volume. Your plans and local jurisdiction decide which one and which sections apply to your project.
Before You Submit
Take 30 seconds and make sure your inspector can follow the structure and its connections from top to bottom, and see any work that will soon be concealed.
Is the framing ready?
- Is all framing, bracing and blocking complete and still exposed?
- Do connectors and fasteners match the plans and truss drawings, with no empty holes?
- Are trusses unaltered and braced as shown on the truss drawings?
- Are holes and notches in studs, plates and joists within limits?
- Are penetrations sealed or blocked where required?
- Is the rough plumbing, electrical and mechanical in place?
Can we see it?
- Can we see the entire framed area?
- Can we see how the roof framing connects to the walls?
- Can we see how the walls connect from the top plates through the studs to the bottom plates?
- Can we see how the framing connects to the foundation?
- Did you show all beams, posts and their connections?
- Did you show bracing, straps, ties, rods and hold-downs?
- If structural screws are being used, did you show several locations so we can see the connection pattern?
- Did you show penetrations and concealed openings before they are covered?
- Where required, did you show fire caulk, fire foam or another approved firestopping system?
- Did you show fireblocking where caulk or foam is not appropriate?
- Is everything still exposed and easy to see?
Framing Inspection FAQ
What does a framing inspection check?
Your inspector compares the framing with the approved plans and applicable code: structural members, connections from the roof to the foundation, beams and posts, bracing, and the penetrations and concealed spaces that need to be sealed or blocked.
What happens if my framing inspection fails?
Your inspector will tell you what needs to be corrected. Fix the item, keep the area exposed, and submit new photos and video of the corrected work through Permit Rockstar.
Can I install insulation or drywall before the framing inspection is approved?
No. Keep the work exposed until it is approved. Covering framing before it is reviewed can mean uncovering it again.
Do I need a photo of every connector?
Show the whole area first, then close-ups, and several locations for repeated connections, so the inspector can see the installation pattern. Your plans and inspector may ask for more.
Who decides what my project requires?
Your approved plans and engineering, the Florida Building Code (8th Edition, 2023) and your local jurisdiction. This guide helps you show your work. It doesn't replace your plans.
That's It.
Submit your photos and videos through Permit Rockstar. Your inspector will compare the framing, structural connections, penetrations and concealed conditions with the approved plans and applicable project requirements.
BACK TO INSPECTION GUIDESRequirements vary by project, approved plans, engineering and jurisdiction. Follow your permitted documents and your inspector's instructions. Code references are for orientation, not a substitute for the code. Based on the Florida Building Code, 8th Edition (2023).